
AIM Training
FacultyAccessible Information Management (AIM) for Faculty
The department of Access Services at Saint Mary’s University of Minnesota now uses Accessible Information Management (AIM), a secure web-based portal that allows students to request and coordinate their accommodations with faculty. AIM is a comprehensive accommodation and case management software that’s designed for university disability resource offices. Beginning this fall, faculty will be emailed from the AIM system when a student shares their accommodations with them. AIM generates a Faculty Notification Letter (formerly called Notice of Accommodation letter) that instructors can view while the student is enrolled in their course. Instructors will have access to an AIM Instructor Portal to view and manage accommodations in a central location. This portal is where they will be able to view Faculty Notification Letters. Instructors will login into the AIM Instructor Portal using their SMU credentials.
Guide for Using the AIM Instructor Portal
What Faculty Can Do In The AIM Instructor Portal
How to Toggle Between Light Mode and Dark Mode
Overview on Faculty Notification Letters
Using the Video Captioning Module
Using the Alternate Format Module
Using the Communication Access Module
Adding an Additional Instructor in AIM
Guide for Using the AIM Alternative Testing Module for Faculty (Winona Faculty Only)
Completing the Faculty Alternative Testing Agreement Form and Exam Details Section
Editing Exam Details and Uploading Exam Files to the Exam Date
Duplicating Exam Details to Additional Exam Dates
Copying the Faculty Alternative Testing Agreement Form & Exam Dates
How to Create Exam Dates for Multiple Course Sections
Approving Individual Exam Requests & Requesting Exams as Rescheduled
Reviewing Completed Exams in AIM
Faculty can use the AIM Instructor Portal to:
- Review the Faculty Notification letters (formerly called Notice of Accommodation letters) you’ve received, which outline accommodations that a student is approved for.
- Find information about whether students need sign language interpreting, real-time captioning, media captioning, and/or materials in alternative formats— ebooks, Braille, large print, etc.
- Use the Alternative Testing Module to track exam requests and upload exams for students with testing accommodations who will be using the Access Services Testing Center in Winona.
How to Toggle Between Light Mode and Dark Mode
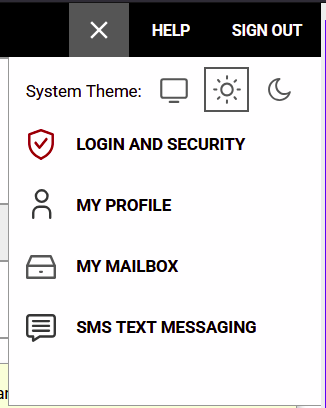
You can view AIM in Light Mode, where the background is white and the text is dark, or in Dark Mode, where the background is dark and the text is white.
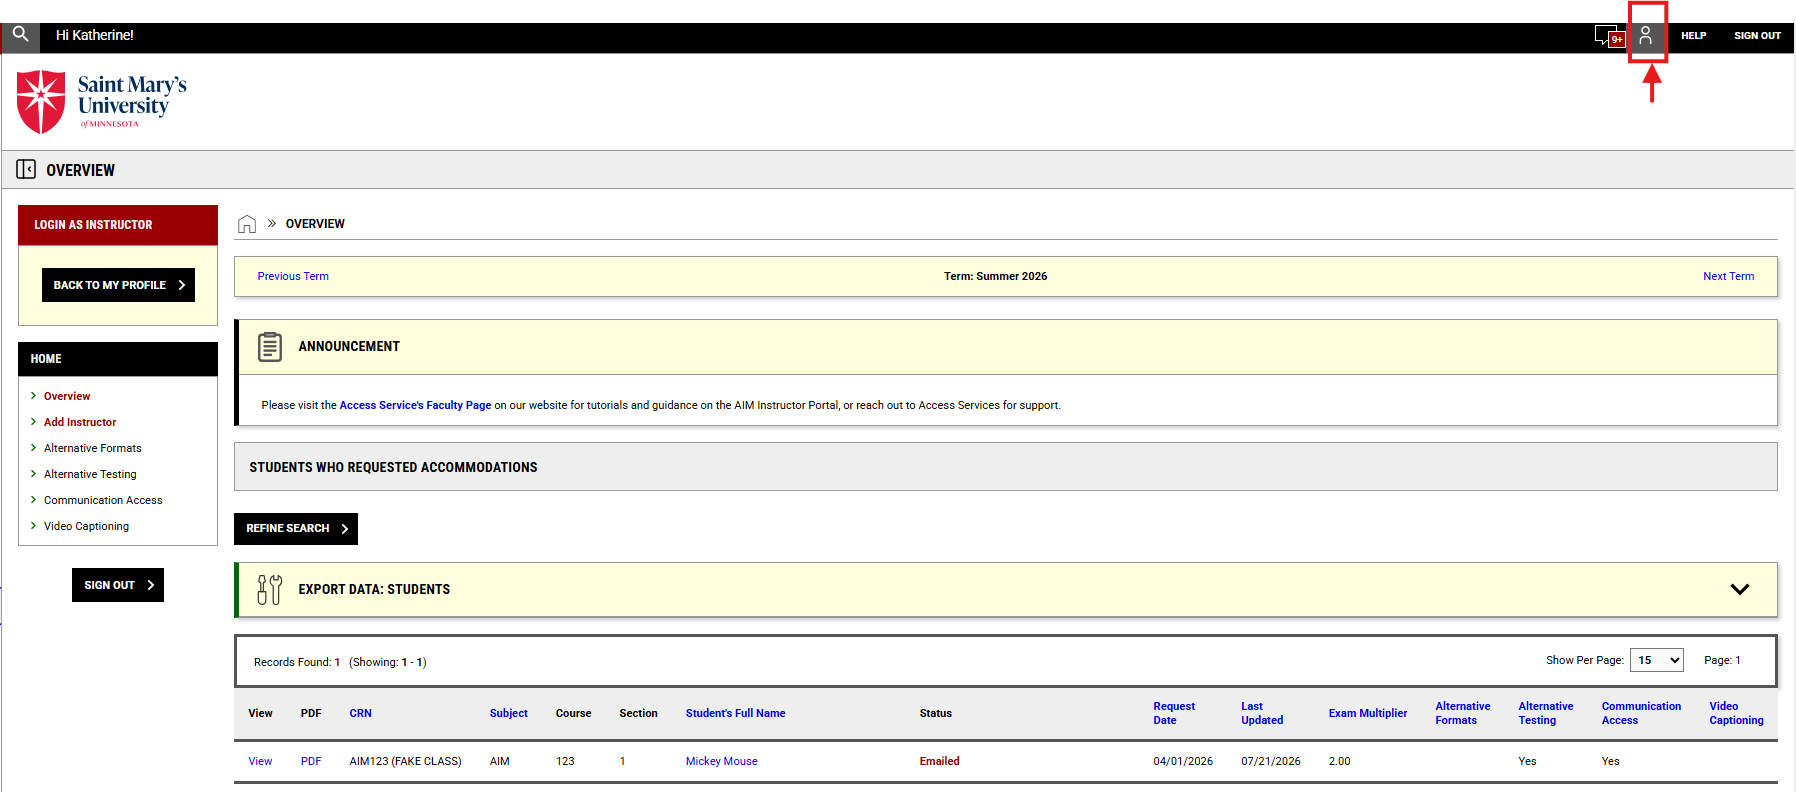
To toggle between Light Mode and Dark Mode, click the small icon of a person in the top right hand corner so that “System Theme” displays. You can then select the the icon of the sun for ‘Light Mode’ or of the moon for ‘Dark Mode‘.
Overview on Faculty Notification Letters
A notice that a student in your course has shared a Faculty Notification Letter with you (formerly called a Notice of Accommodation) will be sent to instructors from the AIM system after a student requests their accommodations. An email will be addressed from the Department of Access Services, and the student will be included on the email. The faculty member will login to the AIM Instructor Portal to view or print any Faculty Notification Letters. Please note, Faculty Notification Letters will not be included directly in the email, you will need to login to the AIM Instructor Portal to view them or print them as PDFs.
- Change in Faculty Notification Letter Recipients: Only professors teaching a course will receive a Faculty Notification Letter. Program Directors and Advisors will no longer receive Faculty Notification Letters from Access Services. If you need a student’s Faculty Notification Letter, you will need to request that the student share it with you directly.
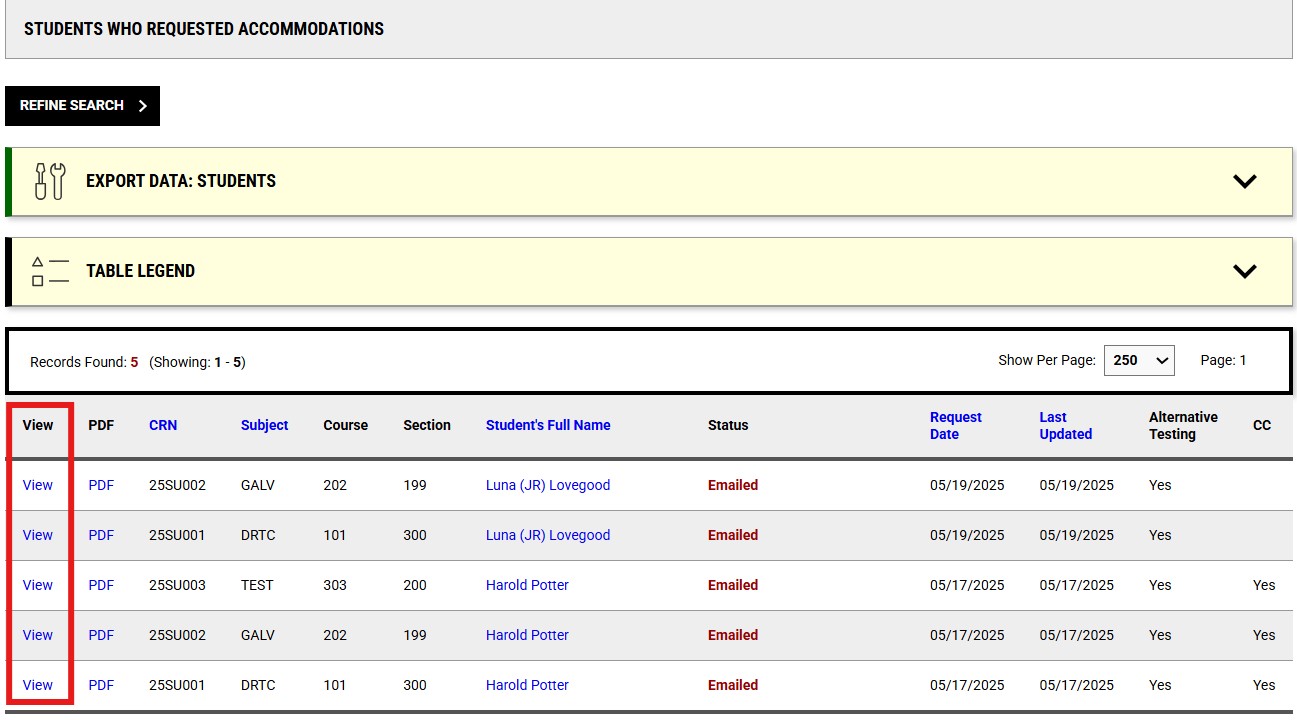
In the AIM Instructor Portal, Faculty Notification Letters will be available to review on the Overview page by clicking on “View” next to the student’s name in the student listing.
Testing Agreement Forms for Winona Faculty
If an undergraduate student in Winona has testing accommodations, their Faculty Notification Letter will have a link to a Faculty Testing Agreement Form you must complete for that course.
- If the student chooses to use testing accommodations, their Faculty Notification Letter will have a link to a Faculty Testing Agreement Form for that course.
- The link is specific to the class and section in which the student is enrolled.
- You only need to complete one Testing Agreement per section.
- If students using our services are enrolled in multiple sections of the same course you teach, you will need to complete separate agreements for every section, but agreements can be duplicated to simplify the process.
- Visit the Faculty Information for the AIM Alternative Testing Module section for more information.
Using the Video Captioning Module
If a student in your course has the accommodation of closed-captioning, you can submit a request that a video or media in your course be closed-captioned through this module, and view requests for closed-captioning that have been submitted.
Adding a Video Request
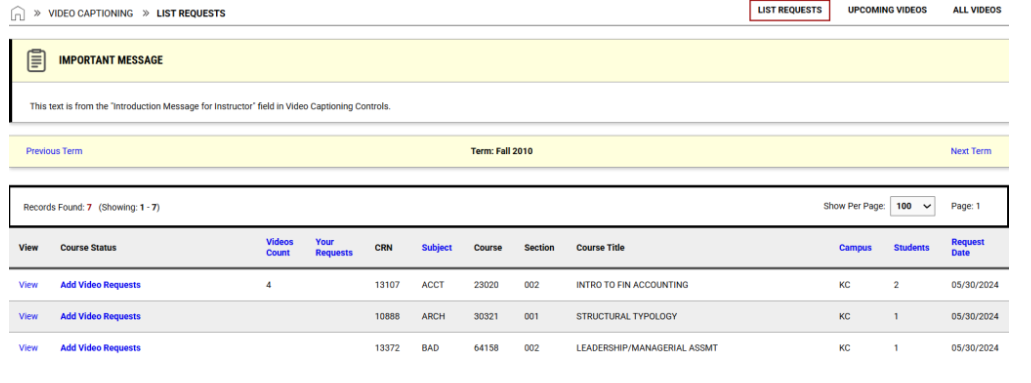
To add a closed-captioning video request, click the blue ‘Add Video Request’ option under the ‘Course Status’ heading within the “Video Captioning Module”. This will bring you to the ‘Video Request Form’.
Viewing List of Requests
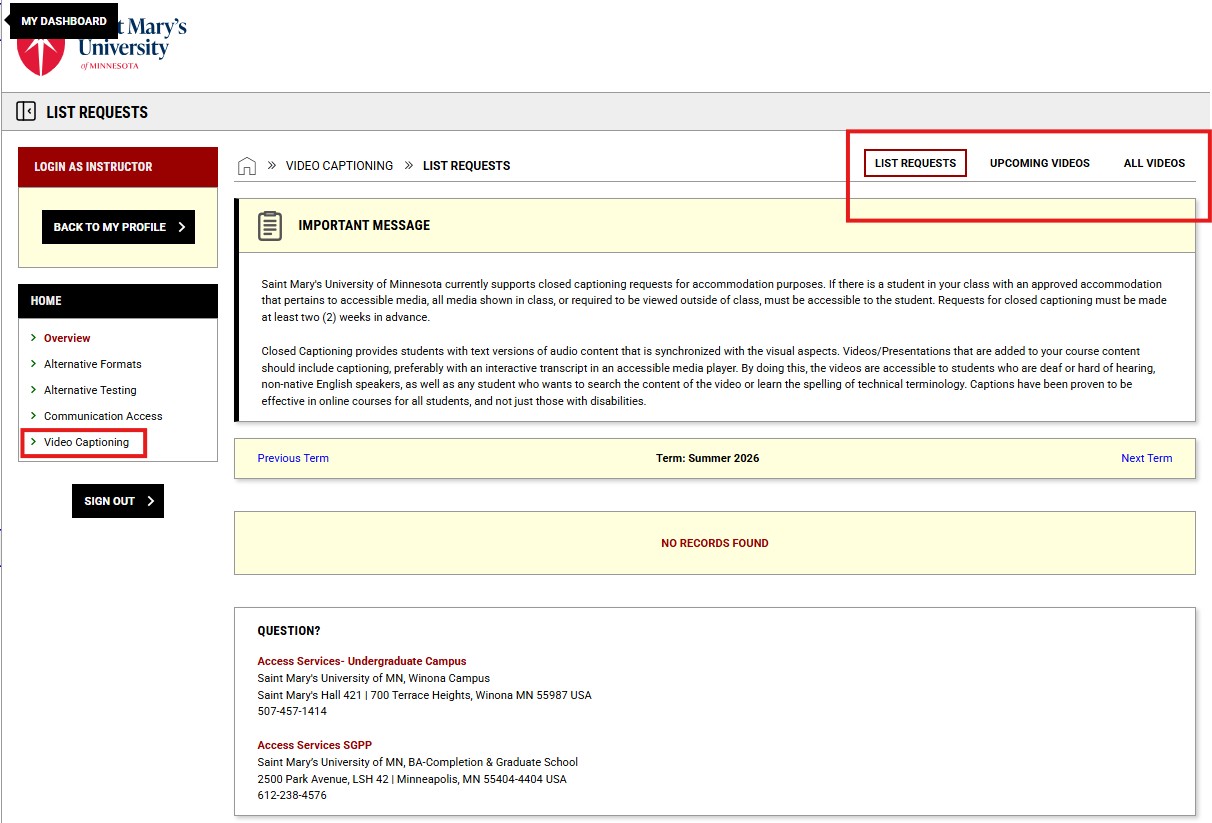
While in this module, you can view a list of your requests, upcoming videos, or all videos by toggling through the choices in the top right corner of your screen.
Add any videos that need to be captioned for that course to the ‘Video Request Form’.
Click the ‘Add Videos’ button at the bottom when you are finished.
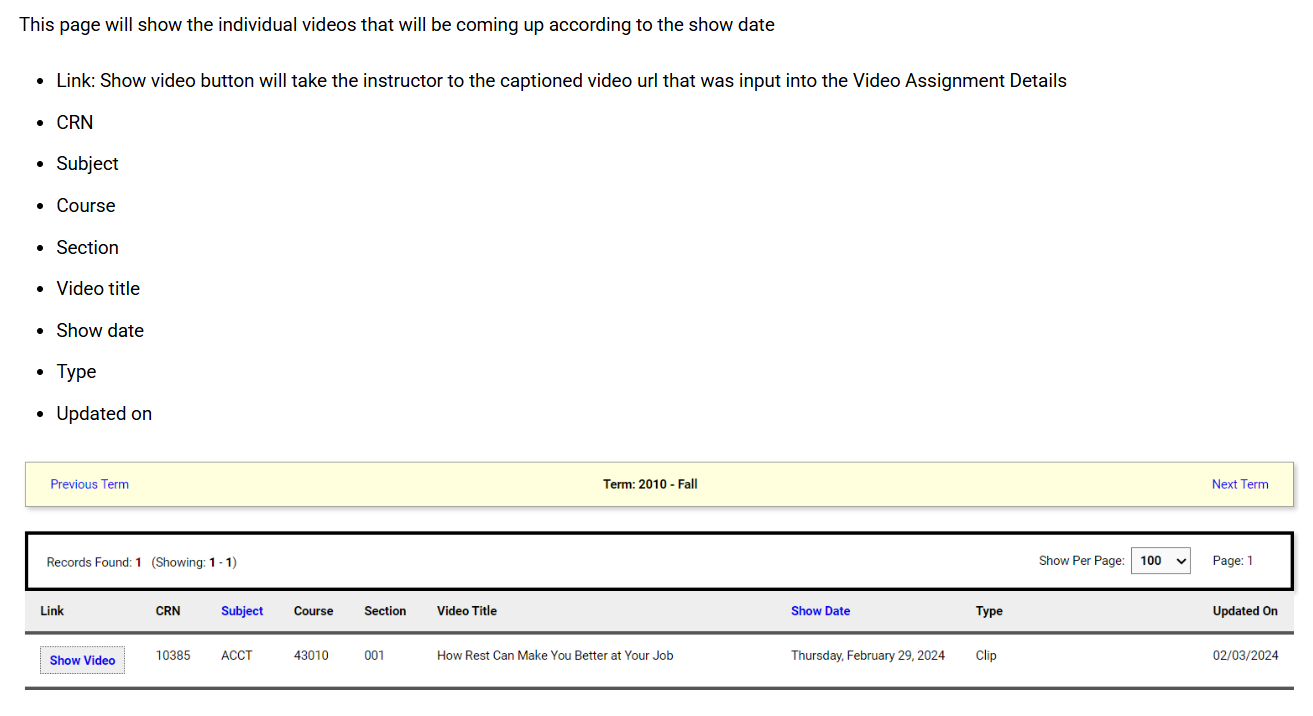
Viewing Upcoming Videos
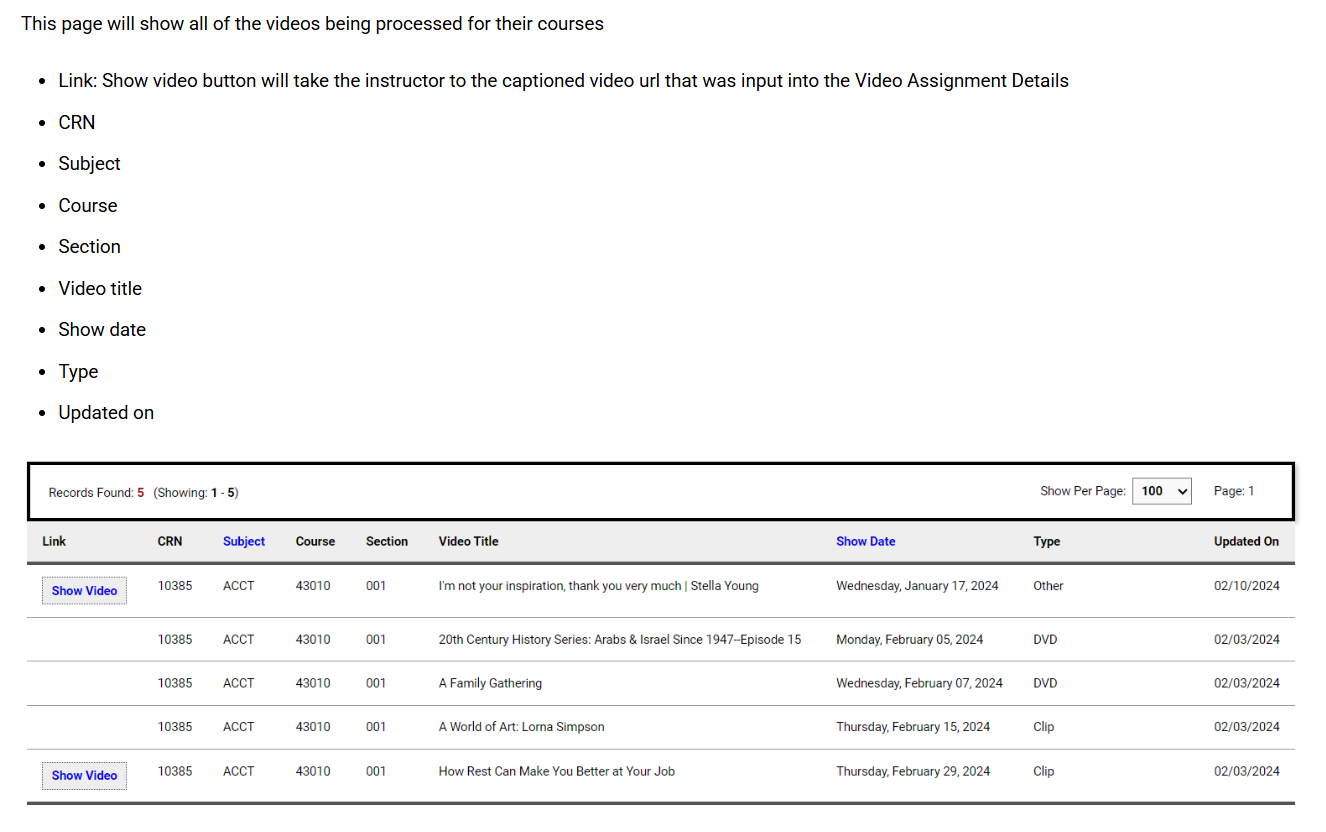
Viewing All Videos
Using the Alternate Format Module
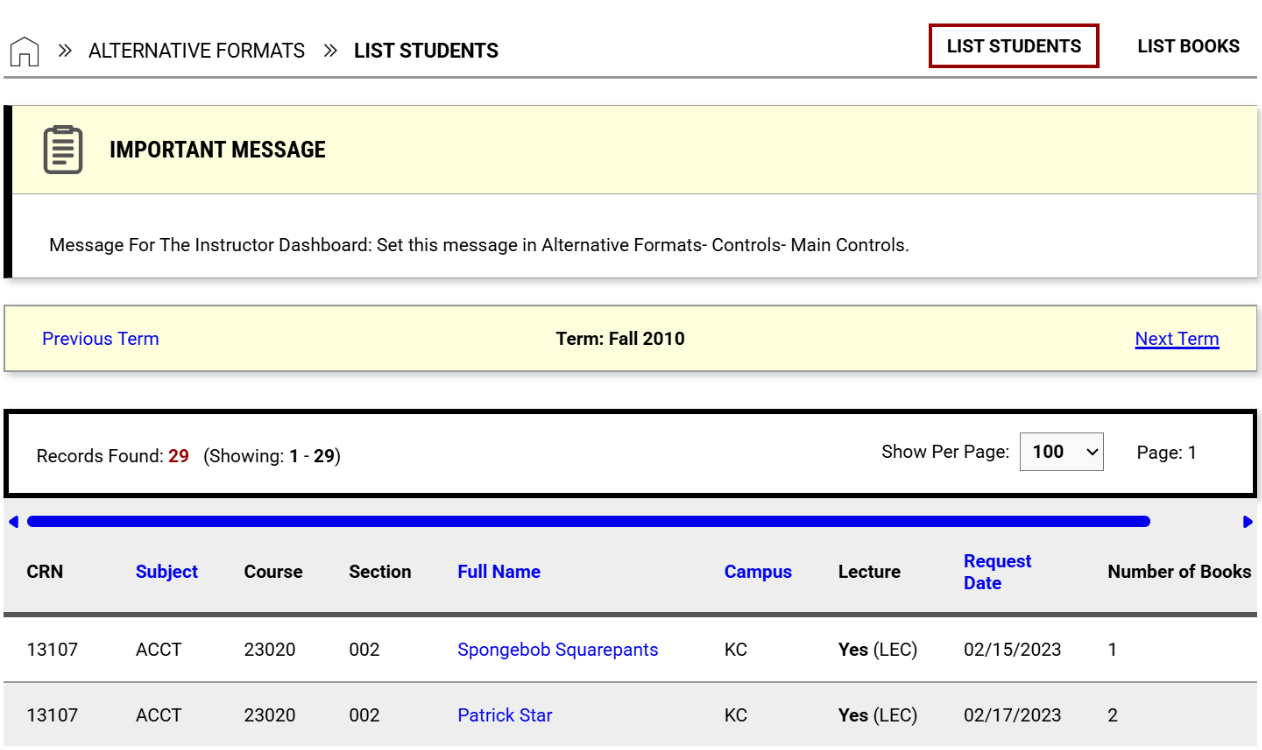
You can use this module to view students in your courses who are approved for the accommodation of alternate format textbooks. As an instructor, there is no action you need to take in this module, it is just for you to stay updated on alternate format book requests that students have made.
List Students/List Books
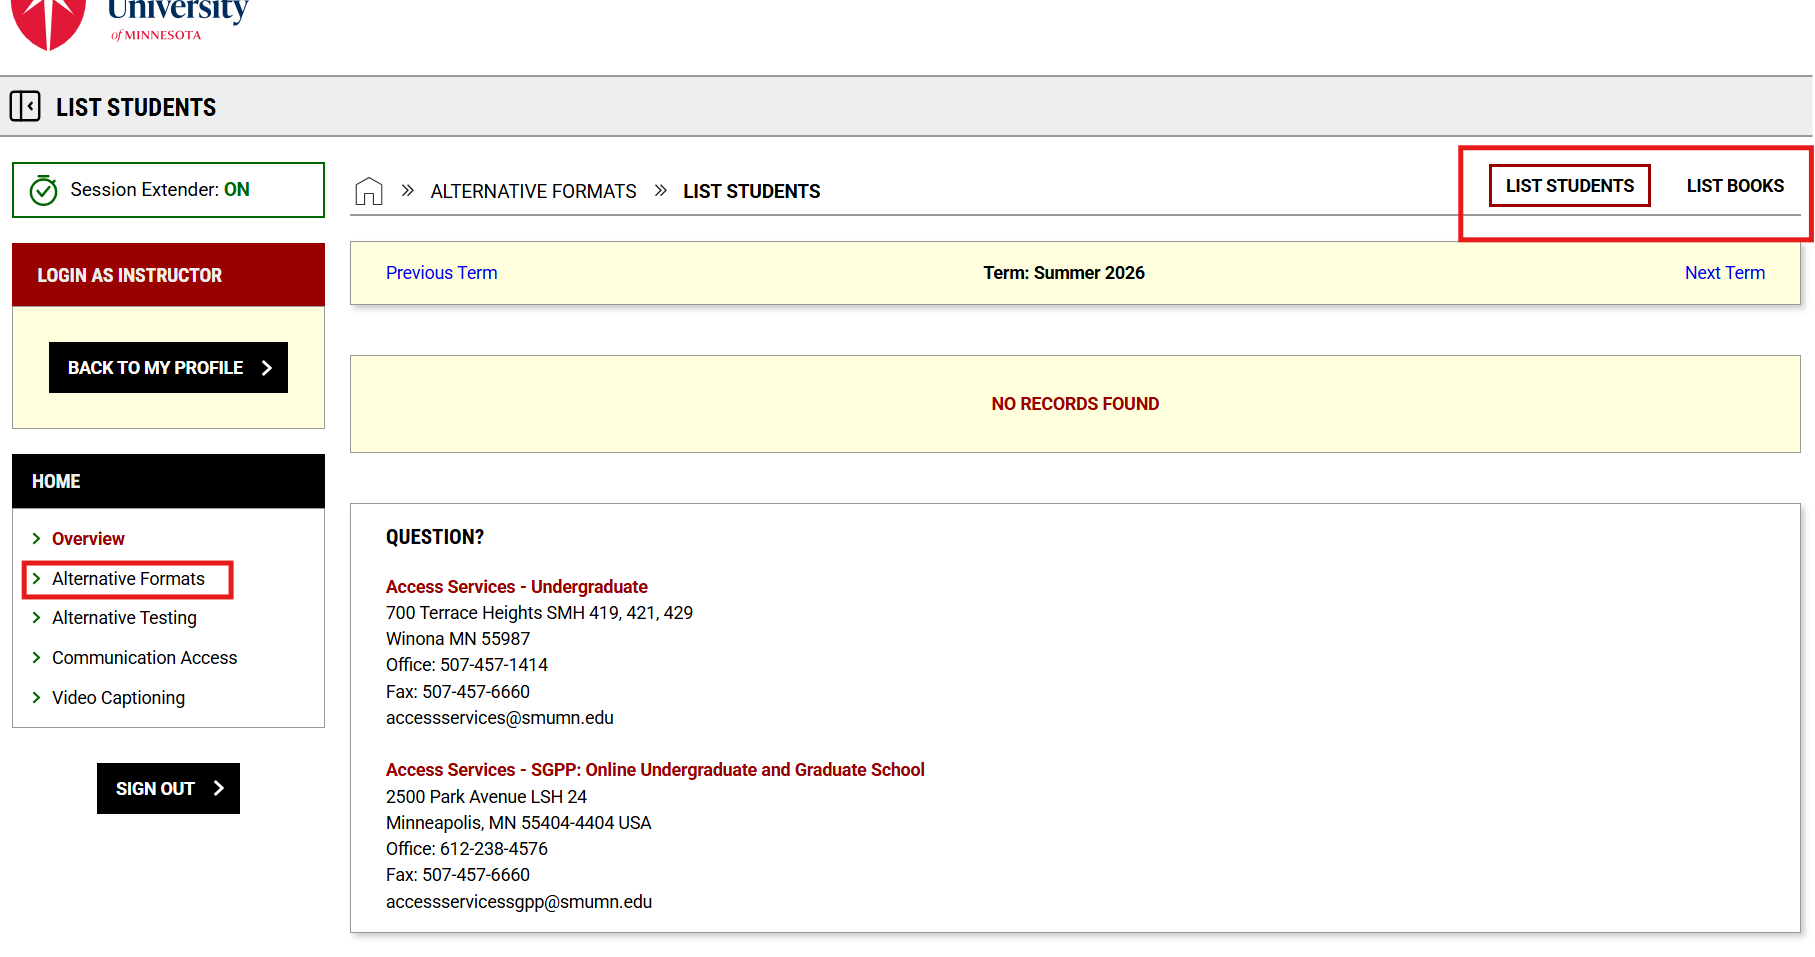
Instructors can see which textbooks are being converted for accessibility. You can view lists By Student or By Books and can navigate between terms.
List Students: List students with the request in a table by term.
List Books: Lists books and other materials individually.
Using the Communication Access Module
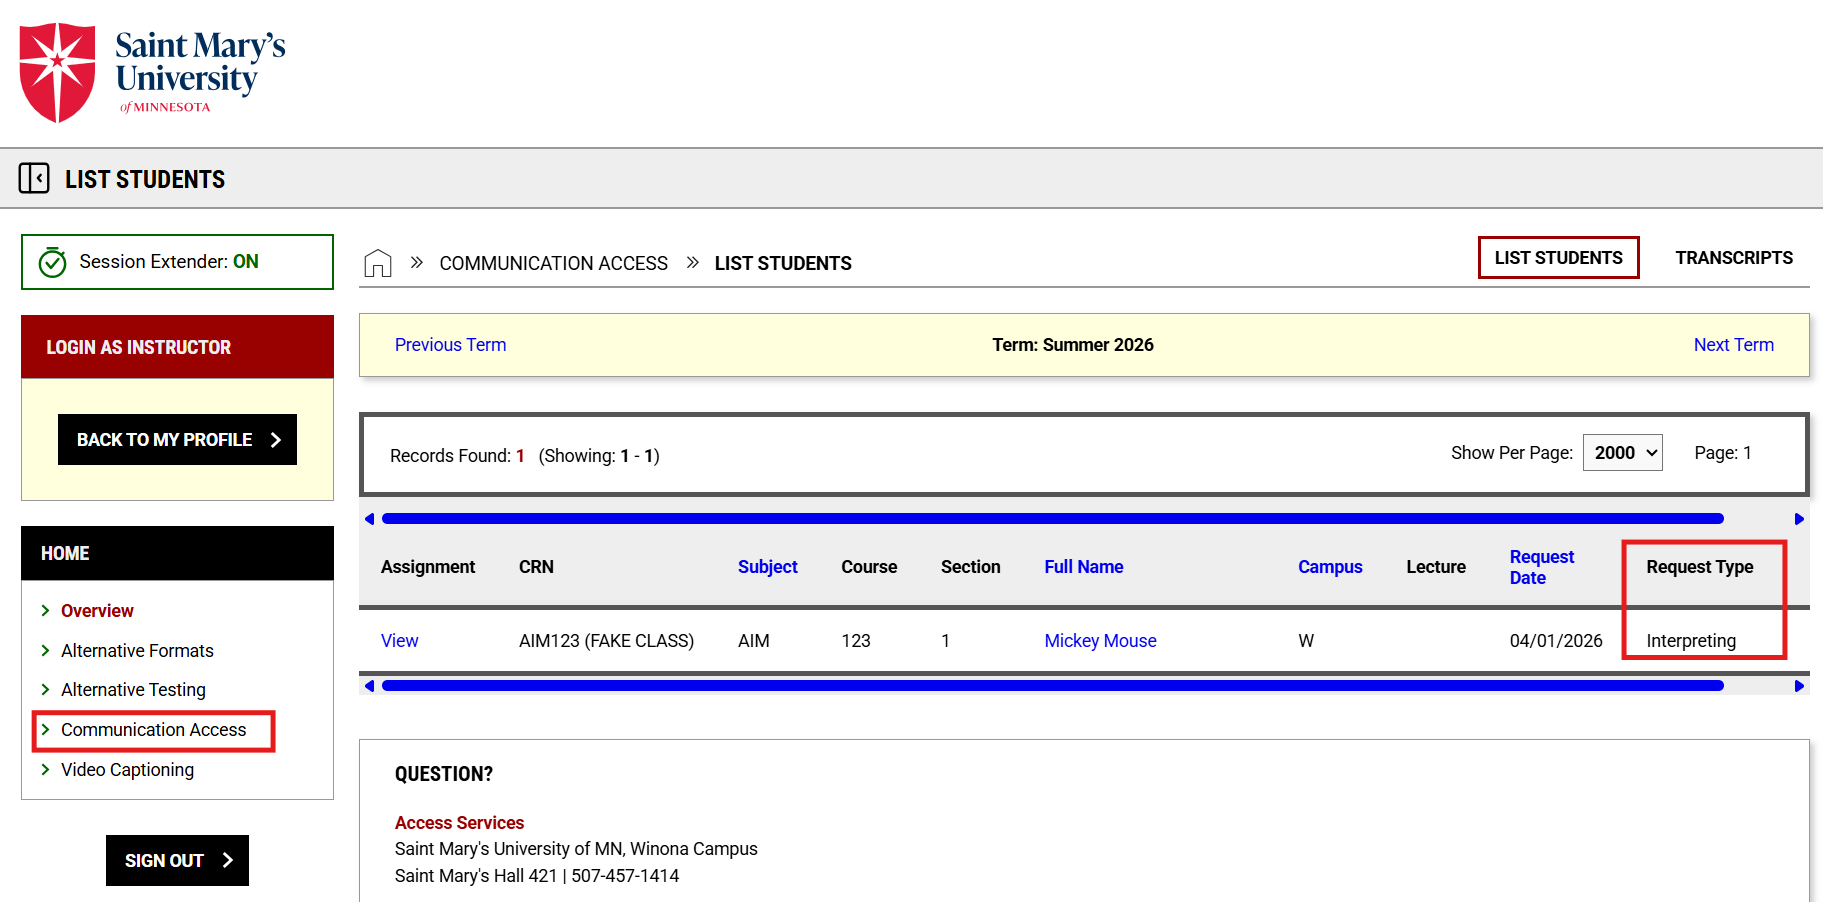
In this module, you can view the requests for ASL interpreting or CART services that students in your courses have made.
List Students
Instructors can see a list of requests for all of their course by students with the service. Clicking View will display the assignment details.
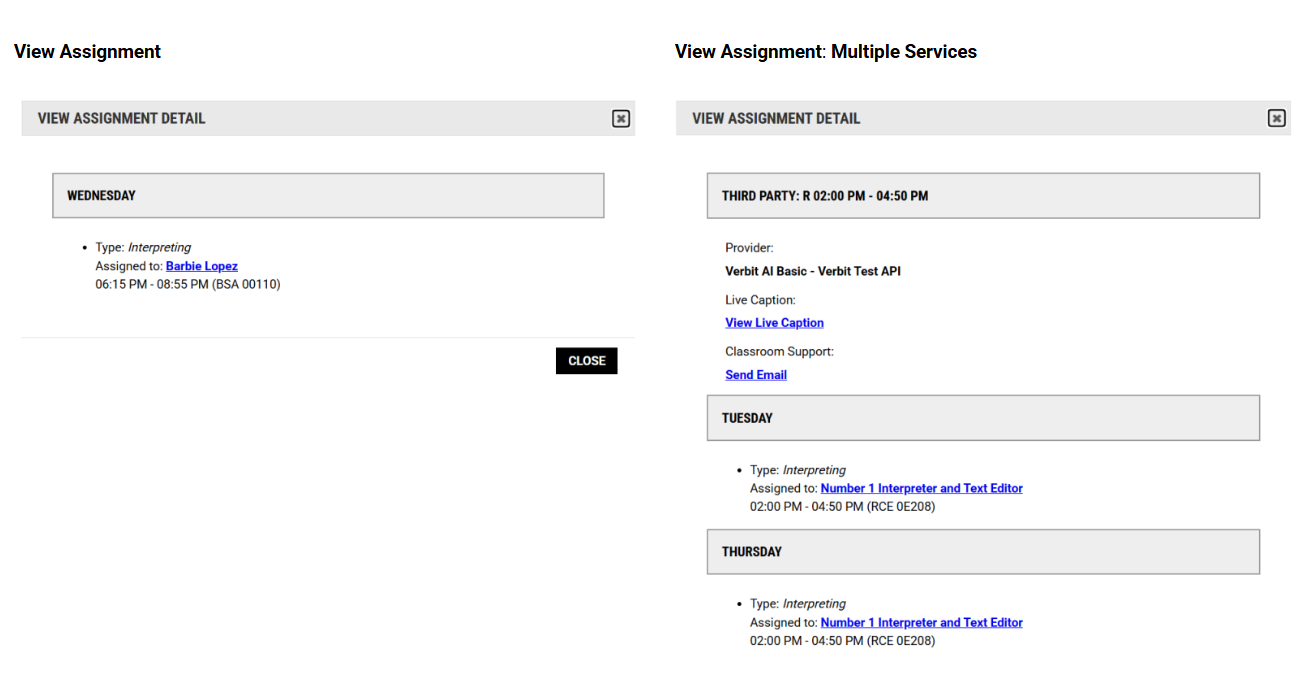
View Assignment
In this module, assignments are services such as ASL interpreting or CART that are booked by a student. This is what you will see if you click “View” on the left side of an assignment.
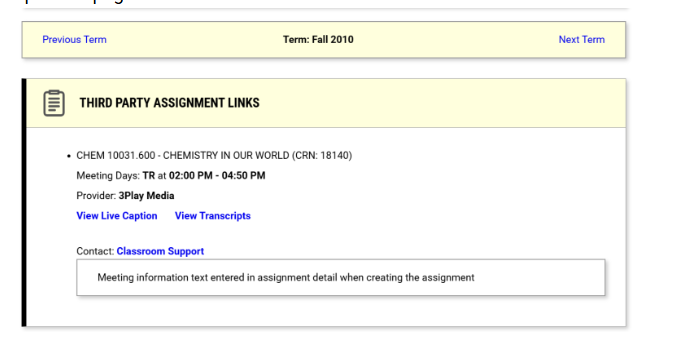
View Transcripts
Click on the Transcripts tab in the top right corner to view transcript files for courses. If the course has any third party assignments, details will be listed at the top of the page.
Adding an Additional Instructor in AIM
This feature is available to instructors who are teaching a course and need to add an additional instructor so that person can also have access to student accommodations and engage with the modules within AIM.
AIM does have a tool that provides a way to add additional staff (i.e. teaching assistants, administrative staff, course coordinator) to have access to be able to review the information available in AIM and help with completing AIM tasks (i.e. Testing Agreements, uploading/downloading exams) through the “Add Instructor” tool.
Step 1: Current Instructor Submits Request to Add Instructor
- Current instructor, log into the AIM Instructor Portal
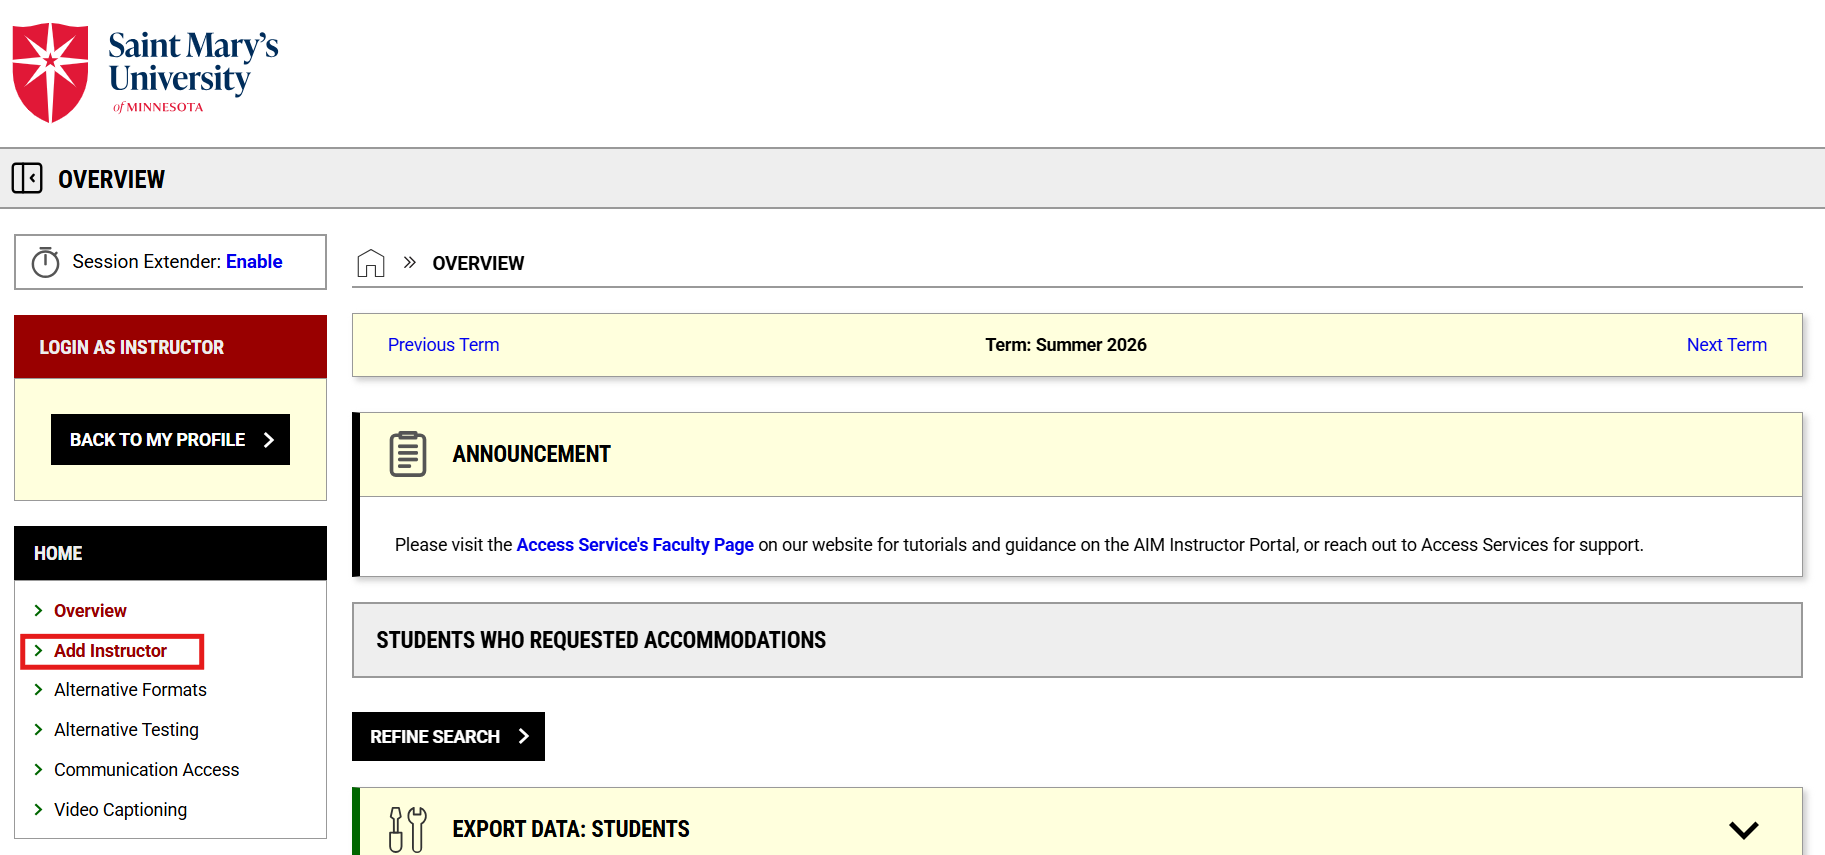
- On the Overview page, in the top right click on Add Instructor.
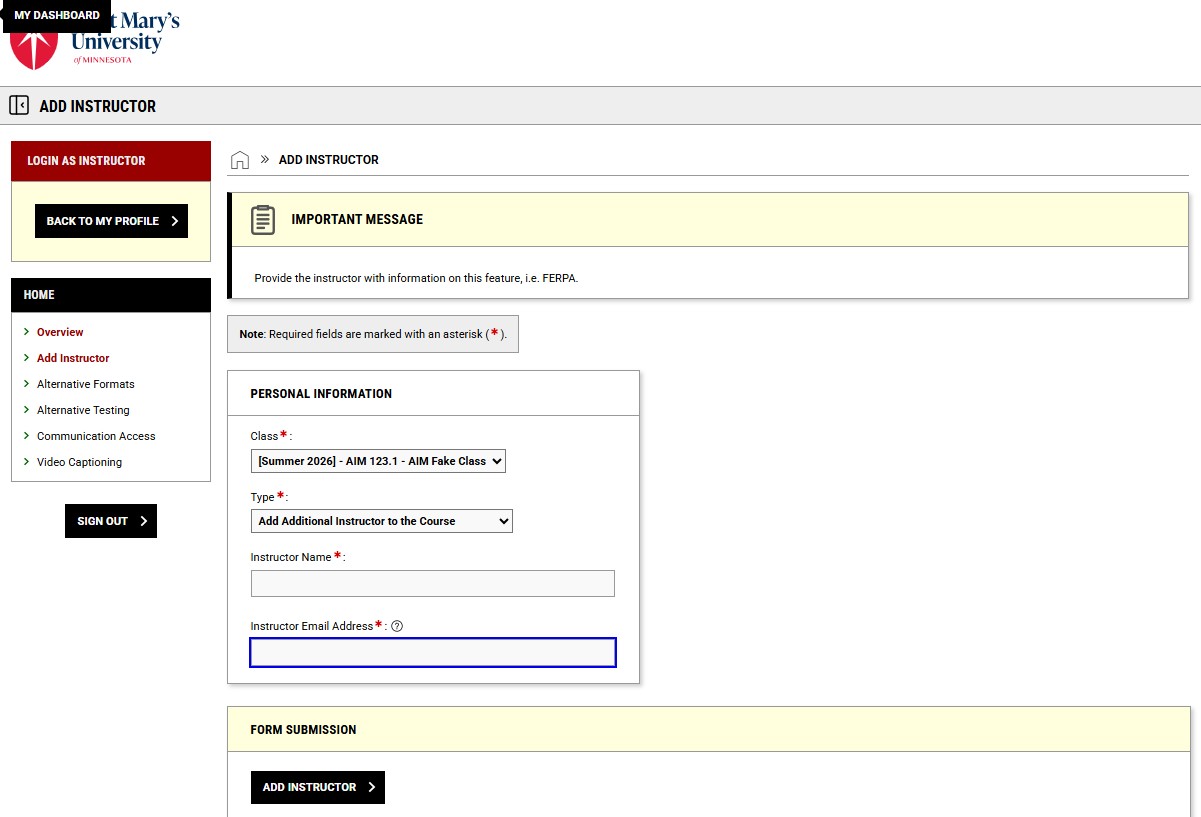
- Select the Class and set Type to “Add Additional Instructor to the Course”.
- Enter the additional instructor’s name and email address (please use their @smumn.edu address).
- Click Add Instructor.
Step 2: Added Instructor/Staff member responds to email confirmation
- AIM will generate an email to the added instructor/staff member for each class/section they have been added to by the instructor of record.
- There will be a Confirm Your Assignment link in the email that will take that individual to the SMU login page.
- If there are multiple classes/sections, the added instructor will need to confirm each class.
- Once the added instructor completes the SMU login tasks, AIM will verify their instructor profile. It may take up to 24 hours for newly added instructors to be verified.
Completing the Faculty Alternative Testing Agreement Form and Exam Details Section
- Log into your AIM Instructor Portal.
- There will be a page that has our access policy. Please review, then click Continue to View Student Accommodations.
- Once redirected, on the lefthand side there is a section that says Home with a link down below it that you click on titled Alternative Testing.
- After reading the section labeled Important Message, click on the Faculty Alternative Testing Agreement button at the top of the page. You can also click on the link that says Courses without Alternative Testing Agreement under the Alternative Testing Agreement section below the important message. Both the button and the link will take you to the same page.
- After being redirected, scroll down until you find Step 1: Select Courses. Next to the course you are setting exam dates for, click the red specify button.
- You will be brought to a page with an Information section. After reading the information, scroll down and provide your phone number.
- Students will not see your contact information, it is just for Access Services Testing Center staff in case they need it, but this step is mandatory to upload exam dates.
- Next, on the same page there will be a list of questions where you provide instructions for exams in your course. These instructions will apply to all exams, unless you choose to provide exam specific instructions as well. Details on how to do that are in Step 11 below.
- After providing your contact information and answering all the questions, scroll down to the Form Submission section and click on the Update and View Exam Dates button.
- There is now a section called Exam Details where you will provide the information for each exam type, date, grace period (see note below), time, and length. If necessary, add any additional notes in the Additional Notes for Staff box. Hit the “Save Exam Date” button at the bottom of the screen when you are finished.
- If you opt to set a Grace Period, this means you are giving students the flexibility to take the exam within a window of time around the exam date. For example, if your exam is on Friday but you have flexibility for students to take the exam 1 day before, on Thursday, you can indicate that by selecting that you approve requests 1 business day before the original exam day. This will automatically approve exams scheduled within that period, so students will be able to schedule their exam in the Access Services Testing Center for Thursday or Friday.
- You can complete this step now, or you can come back and complete this and all remaining steps at a later date if you do not have the test date information finalized for your course when you complete the Faculty Alternative Testing Agreement Form.
- Now, you will be directed to fill out the “Exam Date Instructions” section. You only need to complete this section if instructions for a specific exam differ from the instructions you provided for the course earlier in the Faculty Testing Agreement Form.
- Next, there is an option to upload an exam in the Upload Exam File section. You do not need to upload an exam to make an exam date, it can be done at a later date. However, adding exam dates is necessary for students to schedule their exams.
- Once you have completed the Faculty Alternative Testing Agreement Form and exam date process, there will be a banner at the top of the page that says Success! Your Action Has Been Completed. Please ensure this banner appears.
Editing Exam Details and Uploading Exam Files to the Exam Date
- Log into your AIM Instructor Portal.
- There will be a page that has our access policy. Read that, then click ‘Continue to View Student Accommodations’.
- Once redirected, there is a section on the lefthand side of the overview page that says “Home”. Under it, there is a link that you click on called “Alternative Testing”.
- At the top of the page, click the ‘Exam Dates’ button.
- Scroll down to the Step 1: Select Exam Dates section and check the boxes next to the exam or exams you would like to modify.
- Next, go to the section that says Step 2: Select Available Options and click the ‘Upload Exam’ button to upload the exam or the ‘Modify Exam Dates’ button to modify exam dates or exam details.
Duplicating Exam Details to Additional Exam Dates
- Log into your AIM Instructor Portal.
- There will be a page that has our access policy. Read that, then click ‘Continue to View Student Accommodations’.
- Once redirected, there is a section on the lefthand side of the overview page that says “Home”. Under it, there is a link that you click on called “Alternative Testing”.
- At the top of the page, click the ‘Exam Dates’ button.
- Scroll down to the Step 1: Select Exam Dates section and select ‘Duplicate’ next to the exam dates you wish to copy.
- Once you have selected ‘Duplicate’, enter in the additional exam date and information, and if needed you can modify any existing exam details.
- At the bottom of the screen select ‘Save Exam Date’.
- If you have any exam details that vary significantly from your first exam date, you can fill out a new ‘Exam Date’ form. This button is located below the List Exam Dates section of the page.
Copying the Faculty Alternative Testing Agreement Form & Exam Dates
- Log into your AIM Instructor Portal.
- There will be a page that has our access policy. Read that, then click ‘Continue to View Student Accommodations’.
- Once redirected, there is a section on the lefthand side of the overview page that says “Home”. Under it, there is a link that you click on called “Alternative Testing”.
- After reading the section labeled Important Message, click on the Faculty Alternative Testing Agreement button at the top of the page. You can also click on the link that says Courses without Alternative Testing Agreement under the Alternative Testing Agreement section below the important message. Both the button and the link will take you to the same page.
- Scroll down to the Step 1: Select Courses section and select ‘Copy’ next to the exam dates you wish to copy.
- Select ‘View’ for the course you’d like to copy the Faculty Alternative Testing Agreement Form from.
- You can copy a Faculty Alternative Testing Agreement Form to one course or to multiple courses. Choose either ‘Copy to Selected Courses’ or ‘Copy to All Courses’, depending on how you’d like to copy the form.
- Select the course section to which you would like the Faculty Alternative Testing Form to be applied. Click ‘Continue’.
- Select if you would like the exam dates to be copied or update the dates/times for the exam/s for this section of the course.
- Click on ‘Copy Faculty Alternative Testing Agreement Form’.
How to Create Exam Dates for Multiple Course Sections
- Log into your AIM Instructor Portal.
- There will be a page that has our access policy. Read that, then click ‘Continue to View Student Accommodations’.
- Once redirected, there is a section on the lefthand side of the overview page that says “Home”. Under it, there is a link that you click on called “Alternative Testing”.
- At the top of the page, click the ‘Exam Dates’ button.
- Scroll down to the Handy Tools section and click the dropdown arrow to open up course options.
- Next, check the boxes of the courses you would like to specify exam dates for.
- Now, you can either click ‘Continue With Selected’ for the courses you checked boxes for, or you can click ‘Continue With All Courses’ to include all courses.
- When you are redirected, you will find a section with the course or courses you selected called Course Information.
- Next, there will be a section called Exam Date Instructions where you will fill out all exam instructions. If you need further clarification on any exam instructions, please reference the Completing the Faculty Alternative Testing Agreement Form & Exam Details Section.
- Once you have completed your exam date instructions, click the ‘Save Exam Date’ button under the Form Submission section.
- Once you have completed these steps there will be a banner at the top of the page that says Success! Your Action Has Been Completed. Please ensure this banner appears.
Approving Individual Exam Requests & Requesting Exams as Rescheduled
- Log into your AIM Instructor Portal.
- There will be a page that has our access policy. Read that, then click Continue to View Student Accommodations.
- Once redirected, there is a section on the lefthand side of the overview page that says “Home”. Under it, there is a link that you click on called “Alternative Testing”.
- On your Alternative Testing homepage, you will see a list of exams that your students have scheduled. Any exams labeled ‘Exam Request Requiring Approval’ will need to be approved by you manually through the AIM Faculty Portal.
- To approve requests individually, you should select the red text that says ‘Instructor Approval Required’. This will take you to the page which allows you to approve an exam request or allows you to request the exam as rescheduled to a different date or time by the student.
- To approve the exam request, select the ‘Approve Request’ button.
- To approve multiple exam requests at once, navigate to the homepage of the Alternative Testing module. Once there, you can select the checkbox on the left side of each student’s name that you’d like to approve and select the box that says ‘Approve Selected Exams’.
- You can request an exam as rescheduled if the student has scheduled outside of the original time without your approval. Access Services Testing Center staff will forward this request to the student.
- To reschedule, go to the ‘Rescheduling Information’ section and select a reason for rescheduling. You can add additional information into the additional notes section if needed.
- Once complete, submit by clicking the ‘Submit Request’ button in the Form Submission section at the bottom of the screen.
Reviewing Completed Exams in AIM
- If you selected in your Faculty Alternative Testing Agreement Form or in the Exam Details section for a specific exam that you’d like your exam scanned and returned to you within AIM, you will receive an email informing you when the exam has been uploaded into your AIM portal.
- Log into your AIM Instructor Portal.
- There will be a page that has our access policy. Read that, then click Continue to View Student Accommodations.
- Once redirected, there is a section on the lefthand side of the overview page that says “Home”. Under it, there is a link that you click on called “Alternative Testing”.
- At the top of the page, click the Completed Files button.
- This will bring you to the list of completed exams where you can choose to download the files.